Sunday, November 5, 2023

Dave Computes Fibonacci Paths

Recall that a Fibonacci word is formed by concatenating the previous two words in the sequence. We'll start with the one-letter words S and T. We concatenate S + T to get the word ST. We concatenate the last two words T and ST to get TST. We concatenate the last two words ST and TST to get STTST, and so on. As you can see, the lengths of the Fibonacci words are themselves Fibonacci numbers.

S
T
ST
TST
STTST
TSTSTTST
STTSTTSTSTTST
TSTSTTSTSTTSTTSTSTTST
STTSTTSTSTTSTTSTSTTSTSTTSTTSTSTTST
TSTSTTSTSTTSTTSTSTTSTSTTSTTSTSTTSTTSTSTTSTSTTSTTSTSTTST
...

Let's look at the word of length 8:  TSTSTTST. If T stands for TURN, and S stands for STRAIGHT, we can think of these as directions for drawing the following path.


It should be clear S marks places where the path continued straight, while T marks places where the path turned 90 degrees. When T occurs on an odd step (as on steps 1, 3, and 5), the path turns left. When T occurs on an even step (as on step 6), the path turns right. Here's the Fibonacci word of length 55.

TSTSTTSTSTTSTTSTSTTSTSTTSTTSTSTTSTTSTSTTSTSTTSTTSTSTTST

And here's the path generated for this word.


Here's the path for the Fibonacci word of length 1597.


And here's the path for the Fibonacci word of length 121,393.


This is the well known Fibonacci Word Fractal. In the remainder of this post, I'll show other paths I generated by altering the rules.

Here's the path for the 8-letter Fibonacci word again, but this time, turning 120 degrees left or right (instead of 90). We can see that, on step 6, the path meets up with its starting point.


And here's the path for the 34-letter Fibonacci word using 120 degree turns. As you can see from the overlapping numbers, some vertices are visited more than once.


The path for a 55-letter word revisits edges as well as vertices. And sometimes the same vertex is visited with both S and T. In the path for an 89-letter word (below), we can see that sometimes the path encloses both triangles and 9-sided figures (like the one near the center of the image).


Here's the path for the 10,946-letter Fibonacci word.


And here it is again, with all similarly oriented regions shaded.


We can see there's a lot going on in this pattern. Here it is again, colored to show larger structures.


These structures are reminiscent of the ones we saw in a pattern shown in a previous post, and reproduced below.


It turns out, these two aperiodic patterns are intimately related. Recall from that previous post that we learned to construct the "intestinal" pattern above by using Fibonacci triangles joined at vertices--the bold lines in the left image below. The right image shows the complement of that pattern, with bold and thin lines exchanged. And we recognize those bold lines as a portion of the paths created above by Fibonacci words with 120-degree turns.


If we generate a path using 72-degree turns, we get the following (length 10,946):


Now let's start messing with the rules. Suppose we continue straight at T and turn 120 degrees at S, as in the following path of length 8:


For a 10,946-letter Fibonacci word, this new rule generates the following path.


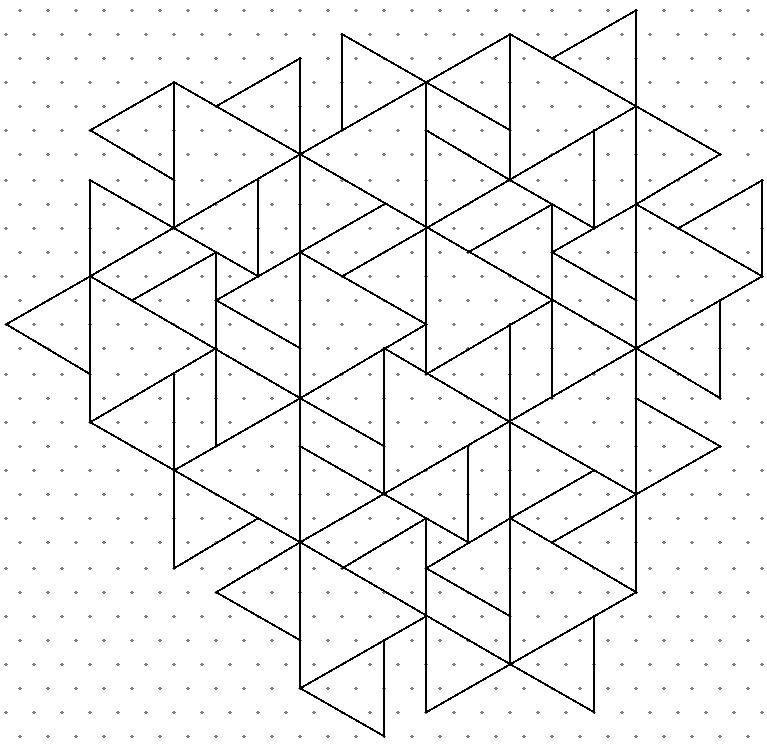
Notice that the path forms a sort of isometric grid, with lines doubled. For example, look at the lines oriented down-and-right. From left to right, we see 1 line, then 2 lines, then 1 line, then 2, then 2, etc., generating the sequence 1212212122121--another Fibonacci word! We see the same effect in the other two directions.

Let's try another rule. Here we go straight on an odd S or even T, and we turn 120 degrees to the right on an even S or odd T.


Here's the path we get for a 6,765-letter Fibonacci word.


Here's another rule. This time, we turn right 120 degrees on any S, go straight on an odd T, and turn left 120 degrees on an even T, as shown here.


Here's the path for a 6,765-letter Fibonacci word.


Back to 90-degree turns. Recall that the Fibonacci word fractal is constructed by turning on T (with the direction depending on whether we're on an odd or even step) and going straight on S. If we turn on S instead of T, we get the following variation on the Fibonacci word fractal (after 1597 steps).


Here is another path using 90-degree turns.

right on odd T and even S (10,946 steps)

Monday, July 31, 2023

Dave Computes Fibonacci Triangles (joined at edges)

This is the third post in a series that began with my post on Fibonacci Bands in Aperiodic Patterns. The second post in the series focused on patterns created by joining Fibonacci triangles at their vertices. In this post, we'll look at related aperiodic patterns created by joining Fibonacci triangles at their edges. As before, we start with an equilateral triangle whose side lengths correspond to a Fibonacci number. In this case, I've started with a 13-triangle.


In this pattern, we add the next two smaller sized Fibonacci triangles to each edge. Going clockwise around the 13-triangle, I've placed a 5- and then an 8-triangle adjacent to each edge. (Likewise, I could have placed an 8- and then a 5-triangle, as long as I'm consistent across all steps of generating the pattern.)


Next, I surround each 8-triangle with 3- and 5-triangles, in the same manner as before (left image). Then I surround each 5- with 2- and 3-triangles (right image).


Next, I surrounded each 3-triangle with 2-triangles. I omitted the 1-triangles, which I think just add too much clutter.


I've colored this image to highlight Fibonacci bands, with the big dark blue triangles corresponding to 0-bands, and the small yellow and green triangles corresponding to 1-bands. Thus, reading from top to bottom, these bands form the Fibonacci word 1011010110110101101.


Here's the same pattern again, this time starting from an 8-triangle (and using the isometric dot grid differently to allow for more detail later).


Consider each of the 1-triangles that I omitted when surrounding the 3-triangles. I connect the vertices of each of those 1-triangles to the centers of those triangles, forming the bold Y shapes in the image below.


Going clockwise around each 2-triangle, I leave the first half of each side alone, and add a Y shape to the I second half of each side (left image). The result is remarkably similar to an image we saw in the previous post, when we joined Fibonacci triangles at their vertices (right image). Personally, I find the left image more pleasing. And it reminds me of brain tissue.


Next, we'll add a few lines to each of the 3-triangles to form propeller shapes.


Adding lines to the 2-triangles and parallelograms gives us the following--an unmistakeable chevron tiling matching those introduced in the paper An Aperiodic Monotile. The shapes outlined in bold correspond precisely to the chevron version of the metatiles from that paper.


And this gives us a new way to think about the chevron tiling. It's simply formed by joining decorated Fibonacci triangles, in the manner described above. These triangles are easily seen in the image below.


In An Aperiodic Monotile, the authors show that there is a one-to-one correspondence between chevrons and "hat" tiles. The images below show a chevron broken into 3 L's, which form a "hat" tile (that we humbly believe looks more like a T-shirt than a hat).


Unfortunately, we can't simply draw hats into the Fibonacci triangle pattern, but we can come close. The images that follow show the correspondence between chevron Fibonacci triangles and hat triangles (and parallelograms).


And here's a complete set of hat triangles/parallelograms (to scale).


And, finally, here's a distorted Fibonacci triangle pattern that emerges from using this set of triangles/parallelograms.


Saturday, July 29, 2023

Dave Computes Fibonacci Triangles (joined at vertices)

This is a continuation of my post on Fibonacci Bands in Aperiodic Patterns. This time we'll look at using these bands to generate patterns with threefold rotational symmetry. The image on the left shows a set of horizontal Fibonacci bands. A second set of bands has been added to the figure on the right, rotated 120 degrees.

And a third set of Fibonacci bands has been added to the image below, rotated another 120 degrees.

In the image above, 48.8% of the pixels are colored yellow. These correspond to places where a single 0-band crosses a pair of 1-bands. Here's a breakdown of the pixels in the image.

0 Bands  1 Bands  Color   Percent
3        0        blue     7.3%
2        1        green   22.1%
1        2        yellow  48.8%
0        3        red     21.7%

Here is the same image, colored black only where three 0-bands meet (the blues in the original image).

Notice the triangles are all the same size, and they appear in two different orientations. Together, they form an isometric grid without any gaps. This only occurs when the Fibonacci bars are tuned just right. The animation below shows that when the horizontal bars are shifted upward, different sized shapes appear and disappear, often leaving gaps.

Here is that same image again, this time colored black wherever two or three 0-bands meet (the blues and greens in the original image).


Again, all the triangles are the same (larger) size, and they appear in two different orientations. Again, this only occurs when the Fibonacci bars are tuned just right. The animation below shows that when the horizontal bars are shifted upward, different shapes appear and disappear.

In the animation below, the black pixels occur where three 0-bands or three 1-bands meet (reds and blues in the original image).

There are some really interesting moments in this animation, like the ones shown below (colored to highlight shapes). Each one seems like a set of tiles with its own rules.


And what if we tune the position of the horizontal bands just right? We get the following complex fractal image (colored to show shapes). The shapes in this image range in size from a lowly dot (blue), to a triangle (magenta), to arbitrarily large intestinal shapes (like the green one we see only part of).


I discovered a wonderful and illuminating method for drawing these patterns by hand. We start with an equilateral triangle whose side-lengths correspond to a Fibonacci number. Here, I've used 8, so I'll call it an 8-triangle.


On each corner of the triangle, append a smaller triangle whose side-lengths correspond to the next smaller Fibonacci number (5-triangles, in this case).


On each corner of these smaller triangles, append a triangle whose side-lengths correspond to the next smaller Fibonacci number (3-triangles, in this case). It gets a little trickier here. Not only are the corners of each 5-triangle surrounded by 3-triangles, but the original 8-triangle is also surrounded by 3-triangles--one on each side, 5 units away.


The process continues, adding 2-triangles, and then 1-triangles.


Finally, we add a second round of 1-triangles. (Some of these will appear inside 2-triangles, but I've chosen to omit those from my drawing.)


Coloring in the 2- and 1-triangles gives us the following familiar image.


Let's return to the stage when we had drawn the first round of 1-triangles but not the second round.


This time we'll look at each of the 1-triangles. We'll add a rhombus to all three sides of the 1-triangle, producing the following propeller shape.


When we do this for every 1-triangle, we get an image like this:


And here's the same image with all the propellers colored in.


In a pattern like this, but made infinitely large (with arbitrarily large Fibonacci triangles), the black portion would form one contiguous region, and the remaining white portion would form a second contiguous region. Here is the same pattern, with different markings.


These patterns correspond perfectly to the meta-tilings introduced in the paper An Aperiodic Monotile, like the one I've drawn below.


Before we come back to the metatiles, here's an alternative to the earlier propellers. This time, I added three arms to each of the 1-triangles in the first round, like so:


Here's the pattern that results. Again, in an infinite pattern, the black lines would all form a single connected curve, and the white regions would join to form a single contiguous region.


In the next post, we'll use Fibonacci triangles to create a pattern that's intimately related to the "hat" tilings.