Monday, July 31, 2023

Dave Computes Fibonacci Triangles (joined at edges)

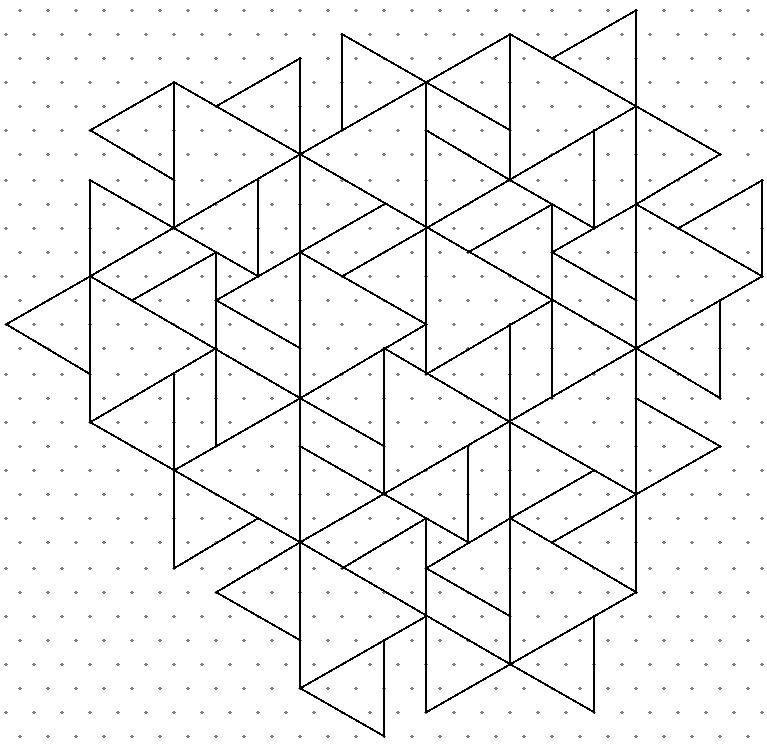
This is the third post in a series that began with my post on Fibonacci Bands in Aperiodic Patterns. The second post in the series focused on patterns created by joining Fibonacci triangles at their vertices. In this post, we'll look at related aperiodic patterns created by joining Fibonacci triangles at their edges. As before, we start with an equilateral triangle whose side lengths correspond to a Fibonacci number. In this case, I've started with a 13-triangle.


In this pattern, we add the next two smaller sized Fibonacci triangles to each edge. Going clockwise around the 13-triangle, I've placed a 5- and then an 8-triangle adjacent to each edge. (Likewise, I could have placed an 8- and then a 5-triangle, as long as I'm consistent across all steps of generating the pattern.)


Next, I surround each 8-triangle with 3- and 5-triangles, in the same manner as before (left image). Then I surround each 5- with 2- and 3-triangles (right image).


Next, I surrounded each 3-triangle with 2-triangles. I omitted the 1-triangles, which I think just add too much clutter.


I've colored this image to highlight Fibonacci bands, with the big dark blue triangles corresponding to 0-bands, and the small yellow and green triangles corresponding to 1-bands. Thus, reading from top to bottom, these bands form the Fibonacci word 1011010110110101101.


Here's the same pattern again, this time starting from an 8-triangle (and using the isometric dot grid differently to allow for more detail later).


Consider each of the 1-triangles that I omitted when surrounding the 3-triangles. I connect the vertices of each of those 1-triangles to the centers of those triangles, forming the bold Y shapes in the image below.


Going clockwise around each 2-triangle, I leave the first half of each side alone, and add a Y shape to the I second half of each side (left image). The result is remarkably similar to an image we saw in the previous post, when we joined Fibonacci triangles at their vertices (right image). Personally, I find the left image more pleasing. And it reminds me of brain tissue.


Next, we'll add a few lines to each of the 3-triangles to form propeller shapes.


Adding lines to the 2-triangles and parallelograms gives us the following--an unmistakeable chevron tiling matching those introduced in the paper An Aperiodic Monotile. The shapes outlined in bold correspond precisely to the chevron version of the metatiles from that paper.


And this gives us a new way to think about the chevron tiling. It's simply formed by joining decorated Fibonacci triangles, in the manner described above. These triangles are easily seen in the image below.


In An Aperiodic Monotile, the authors show that there is a one-to-one correspondence between chevrons and "hat" tiles. The images below show a chevron broken into 3 L's, which form a "hat" tile (that we humbly believe looks more like a T-shirt than a hat).


Unfortunately, we can't simply draw hats into the Fibonacci triangle pattern, but we can come close. The images that follow show the correspondence between chevron Fibonacci triangles and hat triangles (and parallelograms).


And here's a complete set of hat triangles/parallelograms (to scale).


And, finally, here's a distorted Fibonacci triangle pattern that emerges from using this set of triangles/parallelograms.


Saturday, July 29, 2023

Dave Computes Fibonacci Triangles (joined at vertices)

This is a continuation of my post on Fibonacci Bands in Aperiodic Patterns. This time we'll look at using these bands to generate patterns with threefold rotational symmetry. The image on the left shows a set of horizontal Fibonacci bands. A second set of bands has been added to the figure on the right, rotated 120 degrees.

And a third set of Fibonacci bands has been added to the image below, rotated another 120 degrees.

In the image above, 48.8% of the pixels are colored yellow. These correspond to places where a single 0-band crosses a pair of 1-bands. Here's a breakdown of the pixels in the image.

0 Bands  1 Bands  Color   Percent
3        0        blue     7.3%
2        1        green   22.1%
1        2        yellow  48.8%
0        3        red     21.7%

Here is the same image, colored black only where three 0-bands meet (the blues in the original image).

Notice the triangles are all the same size, and they appear in two different orientations. Together, they form an isometric grid without any gaps. This only occurs when the Fibonacci bars are tuned just right. The animation below shows that when the horizontal bars are shifted upward, different sized shapes appear and disappear, often leaving gaps.

Here is that same image again, this time colored black wherever two or three 0-bands meet (the blues and greens in the original image).


Again, all the triangles are the same (larger) size, and they appear in two different orientations. Again, this only occurs when the Fibonacci bars are tuned just right. The animation below shows that when the horizontal bars are shifted upward, different shapes appear and disappear.

In the animation below, the black pixels occur where three 0-bands or three 1-bands meet (reds and blues in the original image).

There are some really interesting moments in this animation, like the ones shown below (colored to highlight shapes). Each one seems like a set of tiles with its own rules.


And what if we tune the position of the horizontal bands just right? We get the following complex fractal image (colored to show shapes). The shapes in this image range in size from a lowly dot (blue), to a triangle (magenta), to arbitrarily large intestinal shapes (like the green one we see only part of).


I discovered a wonderful and illuminating method for drawing these patterns by hand. We start with an equilateral triangle whose side-lengths correspond to a Fibonacci number. Here, I've used 8, so I'll call it an 8-triangle.


On each corner of the triangle, append a smaller triangle whose side-lengths correspond to the next smaller Fibonacci number (5-triangles, in this case).


On each corner of these smaller triangles, append a triangle whose side-lengths correspond to the next smaller Fibonacci number (3-triangles, in this case). It gets a little trickier here. Not only are the corners of each 5-triangle surrounded by 3-triangles, but the original 8-triangle is also surrounded by 3-triangles--one on each side, 5 units away.


The process continues, adding 2-triangles, and then 1-triangles.


Finally, we add a second round of 1-triangles. (Some of these will appear inside 2-triangles, but I've chosen to omit those from my drawing.)


Coloring in the 2- and 1-triangles gives us the following familiar image.


Let's return to the stage when we had drawn the first round of 1-triangles but not the second round.


This time we'll look at each of the 1-triangles. We'll add a rhombus to all three sides of the 1-triangle, producing the following propeller shape.


When we do this for every 1-triangle, we get an image like this:


And here's the same image with all the propellers colored in.


In a pattern like this, but made infinitely large (with arbitrarily large Fibonacci triangles), the black portion would form one contiguous region, and the remaining white portion would form a second contiguous region. Here is the same pattern, with different markings.


These patterns correspond perfectly to the meta-tilings introduced in the paper An Aperiodic Monotile, like the one I've drawn below.


Before we come back to the metatiles, here's an alternative to the earlier propellers. This time, I added three arms to each of the 1-triangles in the first round, like so:


Here's the pattern that results. Again, in an infinite pattern, the black lines would all form a single connected curve, and the white regions would join to form a single contiguous region.


In the next post, we'll use Fibonacci triangles to create a pattern that's intimately related to the "hat" tilings.

Sunday, July 16, 2023

Dave Computes Fibonacci Bands in Aperiodic Patterns

In this post, I'll show that many aperiodic patterns are based on Fibonacci words. Everyone knows the Fibonacci sequence goes 1, 1, 2, 3, 5, 8, 13, 21, 34, 55, 89, etc. Each value is the sum of the two previous values. We can generate the sequence starting from 0 and 1, as follows.

        0
        1
1 + 0 = 1
1 + 1 = 2
2 + 1 = 3
3 + 2 = 5
5 + 3 = 8

Now, instead of treating the values as numbers to be added, think of them as strings to be concatenated. Thus, 1 + 0 gives 10, and 10 + 1 gives 101, producing Fibonacci words like this.

                   0
                   1
1        + 0     = 10
10       + 1     = 101
101      + 10    = 10110
10110    + 101   = 10110101
10110101 + 10110 = 1011010110110

Notice that the lengths of these Fibonacci words correspond to Fibonacci numbers. And each word starts with the bits of the previous word. We can think of these as converging on an infinite Fibonacci word, which begins

10110101101101011010110110101101101 ...

These sequences appear in any Penrose-based aperiodic tiling, as in this picture I drew.


Because these tiles are small and aligned with a grid, it's easy to see that they form horizontal bands. The bands shown in blue are thinner, and the bands shown in yellow and green are wider. On the left, I've marked each of the thin blue rows with a 0, and the wider rows with a 1. Reading down from the top, we get the sequence 110110101101011011, which appears in the infinite Fibonacci word from earlier.

10110101101101011010110110101101101 ...

Penrose-based tilings like this exhibit fivefold rotational symmetry, so we should be able to find these thinner and wider bands in each of the other four directions, and indeed we can. The following shows the exact same picture, but colored to highlight bands running in a diagonal direction.


Reading the bits down from the top-left, we find this sequence also appears in the infinite Fibonacci word.

10110101101101011010110110101101101 ...

These same Fibonacci bands occur in every Penrose tiling, although they can be harder to see.


When I learned of the so-called "hat" tile, I immediately noticed the same Fibonacci bands in these tilings. I've highlighted bands in yellow on this image from the authors of An Aperiodic Monotile.

With Fibonacci bands appearing in the two most interesting families of aperiodic tilings, I decided to write a program to start with Fibonacci bands and generate aperiodic patterns from them. The images below show horizontal and vertical Fibonacci bands. Black bands represent 0s and white bands represent 1s in a Fibonacci word.


Here's an image with both horizontal and vertical bands. Red is used where two 0s meet, black where a 0 and 1 meet, and white where two 1s meet.


And another with diagonal bands.


Devoting fewer pixels per diagonal band generates some nice patterns, due to round-off effects.


Here's that last aperiodic pattern again, this time using only black and white. There is a lot going on in it.


By changing the relative thickness of the original diagonal Fibonacci bands, other interesting aperiodic patterns emerge. (In both images below, black pixels occur where a 0 and a 1 meet. In the left, bands of 1s are 2 pixels wide. On the right, bands of 0s are 2 pixels wide, and a larger portion of the pattern is shown.)


So far, we've only generated patterns using bands running in 2 directions. Using bands running in 5 directions, we can generate Penrose-like aperiodic patterns with fivefold symmetry. Just as every pixel in the images above is part of two different bands, every pixel in an aperiodic pattern with fivefold symmetry is part of five different bands, as in the following image.

In the image above, 40.1% of the pixels are colored green. These correspond to places where two 0-bands cross three 1-bands. Here's a breakdown of the different colored squares in the image.

0 Bands  1 Bands  Color   Percent
5        0        black    3.1%
4        1        white    6.4%
3        2        red     12.4%
2        3        green   40.1%
1        4        blue    32.7%
0        5        yellow   5.2%

Here's the same image in black-and-white, with black corresponding to three 0-bands and two 1-bands.

And the same image again, this time with black corresponding to zero or one 0-bands and four or five 1-bands.

Clearly these are fascinating patterns. Because of how we generated them, we know they're aperiodic and exhibit fivefold symmetry. But are they Penrose patterns? By adjusting the relative widths of 0- and 1-bands, and by moving one set of bands a few pixels this way, another set of bands a few pixels that way, I arrived at the following pattern. The left image uses the earlier coloring rules. In the right image, all the blue and yellow regions have been colored white, and the rest black.

Coloring it as follows, we can see yellow stars, green boats, and blue diamonds in a clear Penrose tiling.


What about threefold symmetry and hat tilings? We'll explore those topics in the next posts.