Pentagonal Penrose Tiling (P1)
This tiling involves drawing pentagons with line segments oriented in one of only 5 possible directions. The smallest pentagons that look decent have line segments with slopes 0/2, 1/2, 2/1, -2/1, and -1/2. The pentagons are oriented either right-side-up (with flat edge on bottom) or upside-down (with flat edge on top).
Neighboring pentagons that share a side are always in opposite orientations.
Gaps occur between neighboring pentagons that touch at only one point and are in the same orientation.
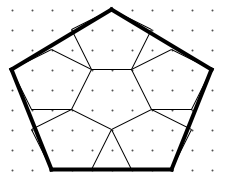
Pentagon tiling is based on the idea that 6 pentagons can be assembled to nearly fill a larger pentagon. (Note that the edges of smaller regular pentagons would align perfectly with a larger regular pentagon. The imperfect alignment is due to the distortion created by drawing less-than-perfect pentagons on a grid.)
We can tile 6 of these larger pentagons to form an even larger pentagon.
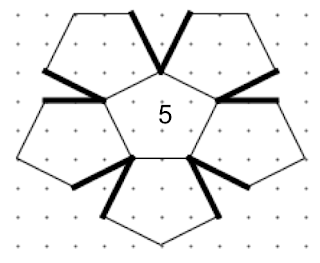
Notice that each of the internal pentagons shares a side with 2, 3, or 5 other pentagons.
If we continue the tiling pattern, we'll see that the gaps between pentagons also come in three shapes: 2-pointed diamonds, 3-pointed boats, and 5-pointed stars.
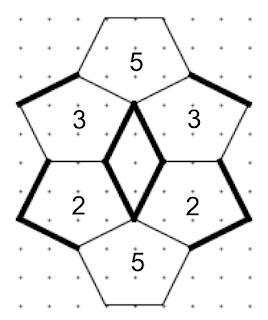
Now let's talk about the matching rules. First, a 2-pentagon can never share a side with another 2-pentagon, a 3 cannot share with another 3, and a 5 cannot share with another 5. Thus, 2s are allowed to touch only 3s and 5s. We can prove that 3s must always sit on 5s and have a pair of 2s on their heads, pointing toward each other.
5s are always surrounded by 2s and 3s, with 2s always appearing in pairs, pointing away from each other.
Diamonds always connect a pair of 5-pentagons. They're always formed by a pair of 2s (pointing away from each other) and a pair of 3s. Notice that diamonds may appear symmetrical, but they have a kind of north and south pole.
Boats are always surrounded by the following pentagons.
Stars are always surrounded by five 2-pentagons. The five points of the star point to a mix of 3-pentagons and 5-pentagons.
The patterns repeat themselves on larger scales. So, just as a 3-pentagon always sits on a 5-pentagon and has two 2-pentagons on its head, a boat always sits on a star and has two diamonds on its head. You can see these relationships in this larger tiling.
Notice all the decagons that appear, each containing a boat and 2 diamonds. Every star is surrounded by 5 such decagons.
The key to drawing any large tiling is to only draw the parts you know for certain, until you prove you're absolutely stuck. At that point, you make a single binary choice, and draw everything that results from that choice until you're stuck again. Each choice reveals more than the previous choice did. If you reach a contradiction, then you made a choice that was inconsistent with the tiling you had so far. In that case, you'll need to study those situations more carefully and identify the patterns you missed.
I enjoy coloring in the gaps and 2-pentagons. The remaining 3- and 5- pentagons themselves form structures with 2, 3, or 5 points, and follow the same matching rules.
Pentagons within Pentagons
Penrose tilings have a fractal nature. They are self-similar at different scales. We can see that by drawing one line in each 2-pentagon and two lines in each 3-pentagon like this.
Confusingly, 5-pentagons sometimes require 0, 1, or 2 lines. Happily, if you draw lines in all 2- and 3-pentagons first, the missing lines in 5-pentagons are easy to figure out.
Notice that the new lines form bigger 2-, 3-, and 5-pentagons, and that each large pentagon of a certain type has the same pattern inside it produced by the smaller pentagons. Also notice that big 2-pentagons contain 2-pointed diamonds, large 3-pentagons contain 3-pointed boats, and large 5-pentagons contain 5-pointed stars.
We can therefore start with a pattern of pentagons of any size and subdivide them into a pattern of smaller pentagons, or build up patterns of bigger pentagons.
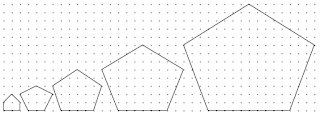
Notice the Fibonacci numbers in the lengths and slopes of the sides in the pentagons we can generate in this manner.
Bottom Length Shallow Slopes Steep Slopes
2 = 2 × 1 ± 1/2 ± 2/1
2 = 2 × 1 ± 2/3 ± 3/1
4 = 2 × 2 ± 3/5 ± 5/2
Notice that, the larger the pentagon is, the better the lines of an inscribed star coincide with the lines of smaller pentagons.
6 = 2 × 3 ± 5/8 ± 8/3
10 = 2 × 5 ± 8/13 ± 13/8
By the way, we can make Penrose tilings with the smallest pentagons, but the result isn't particularly attractive. And it's rather difficult to draw, in part because some pentagons are separated by infinitely thin gaps.
From Pentagons (P1) to Darts and Kites (P2)
If we fill our pentagons as follows, then Penrose's darts and kites (P2) will emerge.
(I think of these as a hoof, spiderman, and dodge.)
Notice that I doubled the length of each line in the pentagons so that the new markings will align with the grid. The gray parts will turn into darts, and the white parts into kites. It takes two gray triangular parts to form a dart, separated by a gap in the pentagons. Notice that there are two kinds of white parts--wider parts and narrower triangular parts. It takes one of each part to form a kite. Knowing that the markings should form darts and kites helps guide drawing the pentagons.
Here you can see both a pentagon (P1) tiling and the corresponding darts and kites tiling (P2). Technically, the kites should extend just slightly into the gaps between pentagons, and the rest of the gaps should be filled by darts. It's easy to extend the darts and kites into the gaps, but it means going off the grid.
One of my favorite tilings is produced by marking the pentagons as follows.
The resulting pattern consists of larger darts and kites, but still retains the diamonds, boats, and stars of the P1 tiling. The darts and kites almost appear curved. I think the result reminds me of flowers and is quite beautiful. I haven't seen this pattern anywhere else.
Here it is again without the pentagons.
Darts and Kites (P2)
We can draw darts and kites without any pentagons. The key is to use two different sets of line segments--a shorter set and a longer set. Notice that these are the same lengths that appeared in the pentagons.
Below you can see how the same longer segments (thick) are used to form both darts (left) and kites (right). In the darts, the shorter segments (thin) point inward. In the kites, the shorter segments point outward. The decagon formed by the kites can serve as a useful guide.
Below we can see all 7 vertices that darts and kites can form. Notice that darts always eat a pair of kites.
Here's a pattern of darts and kites.
Larger darts and kites are found by cutting each dart in half along its line of symmetry, as shown below.
Likewise, we can draw even smaller dart and kite tiles (based on a pseudo-star and pseudo-decagon). Notice that the smallest dart and kite are identical, so shading the darts is helpful.
The advantage of using these very distorted and difficult-to-draw darts and kites is that many can be squeezed into a small drawing.
Penrose's darts and kites (P2) can be used to draw rhombi tilings (P3) by marking the dart and kite tiles as follows. Notice that each marking is taken from the set of shorter line segments.
When we put them together, some of the rhombi (shown in gray) are thinner and entirely contained in kites. Other fatter rhombi are formed when two P2 tiles meet.
Disappearing Pentagons
At some point I tried shrinking the pentagons (P1) into points. Each point still behaves like a 2-, 3-, or 5-pentagon, connecting to the correct number of points.
The diamonds, boats, and gaps between pentagons now take on interesting shapes. Here's the diamond.
And the boat.
And the star.
We can now forget about pentagons altogether and treat these distorted diamonds, boats, and stars as a new set of 3 tiles.
These fit together just as before. Boats still sit on stars. Boats still have two diamonds on their heads. A boat and two diamonds still form a decagon. Stars are still surrounded by 5 decagons. Just as each end of a diamond used to point to a 5-pentagon, now each end of a diamond is a point with 5 connections.
In drawing these, it's helpful to be aware of the three possible shapes that emerge between stars. These act like super-diamonds, super-boats, and super-stars.
Shading the diamonds results in the following fascinating pattern. Notice the white regions formed by stars and boats now act like larger diamonds, boats, and stars.
The prevalence of decagons in these patterns made me realize that I could make the tiles even smaller to form pseudo-decagons. Here are my smaller tiles.
With smaller tiles, we can make a more detailed tiling in the same size grid. The best thing about these tiles is they're the only ones I've found that use exclusively horizontal, vertical, and 45-degree diagonal segments to generate reasonably attractive pictures. Therefore, if you wanted to tile a your floor based on Penrose, I'd choose this tile set.
Here's a nicer coloring of the same picture.
Rhombi (P3)
Starting with distorted diamonds, boats, and stars, we can inscribe rhombi to produce Penrose's rhombi tilings (P3). Thinner rhombi have been shaded in.
The matching rule requires that any socket (like the two sockets in a boat or the five sockets in a star) must be filled by a thin (shaded) rhombus. Below you can see a Penrose rhombus tiling (P3) and the distorted diamonds, boats, and stars (with thick outlines) used to create it.
Happy tile drawing!


