I started by coding from formulas I found online. But without understanding the formulas, I was unable to debug them. A key insight, therefore, was figuring out how to code 3-D through a series of understandable stages, as I will present below.
I definitely recommend coding an overhead 2-D view before modifying the code to present 3-D graphics. It's even helpful to switch back and forth between the two views in your testing, or to show both views on the screen at the same time. And so we'll begin with the basics of 2-D graphics.
2-D Basics
I'll assume my reader is comfortable coding with 2-D graphics. The top-left corner of the screen has coordinates (0, 0), with x-coordinates increasing to the right, and y-coordinates increasing going down the screen.


The following pseudocode illustrates how we might draw a circle at each of these points.
for (Point p : points)
drawCircle(p.x, p.y, RADIUS);
Here is the result of running this code for a very simple maze.

The red dot represents our avatar, located at (avx, avy). We might use the keyboard to move the avatar around the space as follows.
if (leftButton) avx -= SPEED; //move west
if (rightButton) avx += SPEED; //move east
if (upButton) avy -= SPEED; //move north
if (downButton) avy += SPEED; //move south
In the second picture below, our avatar has moved north.

Scrolling
My students often ask nervously about making "scrolling" video games (like Super Mario Bros). They expect that scrolling will change everything about the code. In actuality, only the code that performs the drawing needs to change. (It will be the same way when we get to 3-D.)
Specifically, when drawing, we're no longer interested in the absolute position of each point. Instead, we need to know where that point is relative to our avatar. For example, if the avatar is at (100, 50) and a particular point is at (110, 30), then we need to draw that point 10 pixels east and 20 pixels north of the avatar (or -20 pixels south). We'll call these values relx and rely, and we'll compute them as follows.
relx = p.x - avx;
rely = p.y - avy;
These relative coordinates will be far more useful to us than the absolute ones.
We'll always draw the avatar in the center of the screen (CENTER, CENTER), so we should draw this particular point at (CENTER + 10, CENTER - 20). Here's how our code looks now.
for (Point p : points)
{
relx = p.x - avx;
rely = p.y - avy;
drawCircle(CENTER + relx, CENTER + rely, RADIUS);
}
The second picture below shows what it looks like now when our avatar moves north. The red circle representing the avatar remains in the center of the screen, while everything else appears to move.

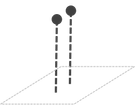
Looking Down on a 3-D World
So far, we've only shown overhead views of the world, where the camera is looking down on the world. In the overhead views we've seen, the screen's horizontal axis corresponds to the east-west direction, and the screen's vertical axis corresponds to the north-south direction.


The stakes point in the up-down direction (along the z-axis), which we cannot perceive from an overhead view. (If some stakes are taller than others, we won't know it.)

Looking North in a 3-D World
Now it's time to work out what our avatar sees. We'll start by assuming the avatar's camera is pointing north.
In this view, the screen's horizontal axis still corresponds to the east-west direction, but the screen's vertical axis now corresponds to the up-down direction--the direction the stakes point.

In this view, we cannot tell north from south anymore. If some stakes are further north than others, we won't know it.

We now draw each stake as a vertical line projected onto the screen.

For the moment, our drawing code no longer depends on rely.
for (Point p : points)
{
relx = p.x - avx;
rely = p.y - avy;
drawLine(CENTER + relx, 0, CENTER + relx, BOTTOM);
}
The second picture below shows the avatar's view of the world, looking north.

Clearly this is disappointing, but we're only in the early stages of implementing 3-D.
What exactly are we looking at? Notice that there are 13 circles at the bottom of the left image, and 13 lines on the right image. If several circles appear in the same column of the left image, they all appear as a single overlapping line on the right image.
What exactly are we looking at? Notice that there are 13 circles at the bottom of the left image, and 13 lines on the right image. If several circles appear in the same column of the left image, they all appear as a single overlapping line on the right image.
Looking Ahead
Notice that all of the circles in the first four columns of the left image (above) are behind the avatar (who is facing north). But we see lines representing those same points on the right image. Since our avatar should not be able to see behind it, clearly we should not draw those lines.
In the overhead view, the avatar's line-of-sight forms an imaginary line pointing north from the avatar to the top of the screen. For any given point we intend to draw, imagine a horizontal line running through that point and perpendicular to the line-of-sight. We'll refer to such a line as a horizon, and it will play a very important role in the rest of our calculations. Right now, we simply wish to know the distance from the avatar to a particular point's horizon. We'll call this value toHoriz. It should be positive for points ahead of the avatar and negative for points behind it.
For now, toHoriz is simply -rely.

In the 3-D view, we should only draw points that have a positive value for toHoriz, as shown in the code below.
for (Point p : points)
{
relx = p.x - avx;
rely = p.y - avy;
toHoriz = -rely;
if (toHoriz > 0)
drawLine(CENTER + relx, 0, CENTER + relx, BOTTOM);
The resulting 3-D view is shown in the righthand image.

Perspective Height
In the overhead view, the avatar's line-of-sight forms an imaginary line pointing north from the avatar to the top of the screen. For any given point we intend to draw, imagine a horizontal line running through that point and perpendicular to the line-of-sight. We'll refer to such a line as a horizon, and it will play a very important role in the rest of our calculations. Right now, we simply wish to know the distance from the avatar to a particular point's horizon. We'll call this value toHoriz. It should be positive for points ahead of the avatar and negative for points behind it.
For now, toHoriz is simply -rely.

In the 3-D view, we should only draw points that have a positive value for toHoriz, as shown in the code below.
for (Point p : points)
{
relx = p.x - avx;
rely = p.y - avy;
toHoriz = -rely;
if (toHoriz > 0)
drawLine(CENTER + relx, 0, CENTER + relx, BOTTOM);
}
The resulting 3-D view is shown in the righthand image.
Perspective Height
It bothers us that all of the lines in the 3-D view are the same height, when we know that objects that are further away should appear shorter. Specifically, an object's apparent height should be inversely proportional to its distance away, as expressed by:
appHeight = VCONST / toHoriz;
appHeight = VCONST / toHoriz;
The "vertical" constant in this formula should be adjusted to match the desired perspective.
for (Point p : points)
{
relx = p.x - avx;
rely = p.y - avy;
toHoriz = -rely;
if (toHoriz > 0)
{
appHeight = VCONST / toHoriz;
drawLine(CENTER + relx, CENTER - appHeight,
CENTER + relx, CENTER + appHeight);
}
}

Perspective Width
Of course, now it bothers us that all of the lines in the 3-D view are the same distance apart, when we know that objects that are further away should appear closer together. Specifically, the x-coordinate where an object appears (relative to the center of the screen) should be inversely proportional to its distance away, as expressed by:
screenx = HCONST * relx / toHoriz;
Again, this new constant should be adjusted to match the desired perspective. We'll now use screenx to draw the objects, instead of relx.
for (Point p : points)
{
relx = p.x - avx;
rely = p.y - avy;
toHoriz = -rely;
if (toHoriz > 0)
{
appHeight = VCONST / toHoriz;
screenx = HCONST * relx / toHoriz;
drawLine(CENTER + screenx, CENTER - appHeight,
CENTER + screenx, CENTER + appHeight);
}
}
The resulting 3-D view is shown in the righthand image. Note the improvement!
for (Point p : points)
{
relx = p.x - avx;
rely = p.y - avy;
toHoriz = -rely;
if (toHoriz > 0)
{
appHeight = VCONST / toHoriz;
screenx = HCONST * relx / toHoriz;
drawLine(CENTER + screenx, CENTER - appHeight,
CENTER + screenx, CENTER + appHeight);
}
}

Rotating and Moving
So far, we've looked at situations where the avatar always points north, and the world translates in the four cardinal directions: east, west, north, and south. Next, we'll see how to rotate the avatar/camera. This means we'll now need to keep track of the avatar's angle, in addition to its position (avx, avy).
For this, we'll need to adopt a convention for interpreting the avatar's angle. We'll say that pointing due north corresponds to an angle of 0 degrees. A clockwise rotation (to the right) corresponds to a positive angle, so that east is at 90 degrees, south is at 180 degrees, and west is at -90 or 270 degrees.

Instead of causing movement, the left and right buttons will now rotate by some fixed angle.
if (leftButton) angle -= ANGLE_SPEED; //rotate left
if (rightButton) angle += ANGLE_SPEED; //rotate right
We want the up button to move forward in whatever direction the avatar is pointing. When the avatar is pointing north (0 degrees), moving forward should decrease avy. When the avatar is pointing east (90 degrees), moving forward should increase avx. For angles in between, moving forward will alter both avx and avy, with the change depending on the sine or cosine of the angle, as shown in the table below.
angle avx change avy change
0 SPEED * 0 SPEED * -1
90 SPEED * 1 SPEED * 0
A SPEED * sinA SPEED * -cosA
Here is the resulting code.
if (upButton) //move forward
{
avx += SPEED * sin(angle);
avy -= SPEED * cos(angle);
}
if (downButton) //move backward
{
avx -= SPEED * sin(angle);
avy += SPEED * cos(angle);
}
Overhead Rotation
We now return to our overhead scrolling program, but now our avatar has an angle indicating which direction it is heading. We want the parts of the world that are ahead of the avatar to appear at the top of the screen. When the avatar is facing north (0 degrees), the distance to the horizon (toHoriz) remains -rely. But, when the avatar is facing east (90 degrees), the distance to the horizon is now relx. For angles in between, toHoriz is a mix of relx and rely, as shown in the table below.
angle toHoriz
0 relx * 0 + rely * -1
90 relx * 1 + rely * 0
A relx * sinA + rely * -cosA
Each point occurs on a horizon, some distance from the avatar's line of sight. We'll call this distance onHoriz, and it will be positive for points to the avatar's right and negative for points to the avatar's left.

When the avatar is facing north (0 degrees), onHoriz is simply relx (which is why we didn't bother introducing it earlier). When the avatar is facing east (90 degrees), onHoriz is rely. For angles in between, onHoriz is a mix of relx and rely, as shown in the table below.
angle onHoriz
0 relx * 1 + rely * 0
90 relx * 0 + rely * 1
A relx * cosA + rely * sinA
The righthand image shows the overhead view when the avatar rotates 30 degrees to the right.

3-D Rotation
We now apply our calculation of onHoriz and toHoriz to our 3-D code. The change is surprisingly small. We simply calculate onHoriz and toHoriz as we did in the overhead code, and we compute screenx from onHoriz instead of relx.
for (Point p : points)
{
relx = p.x - avx;
rely = p.y - avy;
onHoriz = relx * cos(angle) + rely * sin(angle);
toHoriz = relx * sin(angle) - rely * cos(angle);
if (toHoriz > 0)
{
appHeight = VCONST / toHoriz;
screenx = HCONST * onHoriz / toHoriz;
drawLine(CENTER + screenx, CENTER - appHeight,
CENTER + screenx, CENTER + appHeight);
}
}
In the second image below, the camera has turned right by about 6 degrees.

Moving Up and Down
So far, our avatar and its camera have remained at a fixed height. But what if we want to move our avatar up and down along the z-axis? First, we'll start by modifying our point objects to store an x-, y-, and z-coordinate. We'll also need to keep track of the avatar's z-coordinate (avz). We'll also modify our arrow keys to allow us to move our avatar east-west and up-down only.
if (leftButton) avx -= SPEED; //move west
if (rightButton) avx += SPEED; //move east
if (upButton) avz += SPEED; //move north
if (downButton) avz -= SPEED; //move south
In our drawing code, we must now compute a relative z (relz) value. In addition to determining the apparent x-coordinate where the object will be drawn on the screen, we must also compute an apparent y-coordinate, based on the relz value. We'll draw each point as a circle, and so we will need to compute the apparent radius screenr. As before, the larger toHoriz is, the smaller screenx, screeny, and screenr should be. Therefore, these values must all be divided by toHoriz. The resulting code is shown below.
for (Point p : points)
{
relx = p.x - avx;
rely = p.y - avy;
relz = p.z - avz;
toHoriz = -rely;
if (toHoriz > 0)
{
screenx = HCONST * relx / toHoriz;
screeny = VCONST * relz / toHoriz;
screenr = RCONST / toHoriz;
drawCircle(CENTER + screenx,
CENTER + screeny,
screenr);
}
}
The left image below shows a view northward into a tunnel with a square cross section. In the right image, the camera has moved upward, so that we can now look down on the top of the tunnel structure.
if (rightButton) angle += ANGLE_SPEED; //rotate right
We want the up button to move forward in whatever direction the avatar is pointing. When the avatar is pointing north (0 degrees), moving forward should decrease avy. When the avatar is pointing east (90 degrees), moving forward should increase avx. For angles in between, moving forward will alter both avx and avy, with the change depending on the sine or cosine of the angle, as shown in the table below.
angle avx change avy change
0 SPEED * 0 SPEED * -1
90 SPEED * 1 SPEED * 0
A SPEED * sinA SPEED * -cosA
Here is the resulting code.
{
avx += SPEED * sin(angle);
avy -= SPEED * cos(angle);
}
if (downButton) //move backward
{
avx -= SPEED * sin(angle);
avy += SPEED * cos(angle);
}
Overhead Rotation
We now return to our overhead scrolling program, but now our avatar has an angle indicating which direction it is heading. We want the parts of the world that are ahead of the avatar to appear at the top of the screen. When the avatar is facing north (0 degrees), the distance to the horizon (toHoriz) remains -rely. But, when the avatar is facing east (90 degrees), the distance to the horizon is now relx. For angles in between, toHoriz is a mix of relx and rely, as shown in the table below.
angle toHoriz
0 relx * 0 + rely * -1
90 relx * 1 + rely * 0
A relx * sinA + rely * -cosA
Each point occurs on a horizon, some distance from the avatar's line of sight. We'll call this distance onHoriz, and it will be positive for points to the avatar's right and negative for points to the avatar's left.

When the avatar is facing north (0 degrees), onHoriz is simply relx (which is why we didn't bother introducing it earlier). When the avatar is facing east (90 degrees), onHoriz is rely. For angles in between, onHoriz is a mix of relx and rely, as shown in the table below.
angle onHoriz
0 relx * 1 + rely * 0
90 relx * 0 + rely * 1
A relx * cosA + rely * sinA
Now our overhead drawing code reads as follows.
for (Point p : points)
{
relx = p.x - avx;
rely = p.y - avy;
onHoriz = relx * cos(angle) + rely * sin(angle);
toHoriz = relx * sin(angle) - rely * cos(angle);
drawCircle(CENTER + onHoriz, CENTER - toHoriz, RADIUS);
}
3-D Rotation
We now apply our calculation of onHoriz and toHoriz to our 3-D code. The change is surprisingly small. We simply calculate onHoriz and toHoriz as we did in the overhead code, and we compute screenx from onHoriz instead of relx.
for (Point p : points)
{
relx = p.x - avx;
rely = p.y - avy;
onHoriz = relx * cos(angle) + rely * sin(angle);
toHoriz = relx * sin(angle) - rely * cos(angle);
if (toHoriz > 0)
{
appHeight = VCONST / toHoriz;
screenx = HCONST * onHoriz / toHoriz;
drawLine(CENTER + screenx, CENTER - appHeight,
CENTER + screenx, CENTER + appHeight);
}
}
In the second image below, the camera has turned right by about 6 degrees.
Moving Up and Down
So far, our avatar and its camera have remained at a fixed height. But what if we want to move our avatar up and down along the z-axis? First, we'll start by modifying our point objects to store an x-, y-, and z-coordinate. We'll also need to keep track of the avatar's z-coordinate (avz). We'll also modify our arrow keys to allow us to move our avatar east-west and up-down only.
if (leftButton) avx -= SPEED; //move west
if (rightButton) avx += SPEED; //move east
if (upButton) avz += SPEED; //move north
if (downButton) avz -= SPEED; //move south
Here, we've chosen to have z-coordinate values increase as we move upward. For simplicity, we cannot change the y-coordinate to move north-south. (We might choose to have the avatar perpetually moving northward, so that it appears as if we're flying through a 3-D space.) We are also assuming that our camera will always point north again.
In our drawing code, we must now compute a relative z (relz) value. In addition to determining the apparent x-coordinate where the object will be drawn on the screen, we must also compute an apparent y-coordinate, based on the relz value. We'll draw each point as a circle, and so we will need to compute the apparent radius screenr. As before, the larger toHoriz is, the smaller screenx, screeny, and screenr should be. Therefore, these values must all be divided by toHoriz. The resulting code is shown below.
for (Point p : points)
{
relx = p.x - avx;
rely = p.y - avy;
relz = p.z - avz;
toHoriz = -rely;
if (toHoriz > 0)
{
screenx = HCONST * relx / toHoriz;
screeny = VCONST * relz / toHoriz;
screenr = RCONST / toHoriz;
drawCircle(CENTER + screenx,
CENTER + screeny,
screenr);
}
}
The left image below shows a view northward into a tunnel with a square cross section. In the right image, the camera has moved upward, so that we can now look down on the top of the tunnel structure.


Simple Improvements
One simple improvement we can easily implement is to draw so that objects nearer to the camera appear in front of objects that are further away. To do so, we need only to sort the list of objects from furthest to nearest, and draw them in that order. The sorting should occur every time an object moves, thus requiring re-rendering. Assuming that the camera and objects only move in small increments, insertion sort would probably be the most efficient sorting algorithm. Distances for sorting are determined by the Pythagorean formula: sqrt(relx^2 + rely^2 + relz^2). For purposes of comparison, it is not necessary to perform the square-root operation.
We can also use Pythagorean distance to determine when the avatar would collide with another object. This would allow us to introduce walls and other objects that can interact with the avatar.
We can also create a more attractive 3-D world through simple touches, like drawing a horizon line in the background between the sky and the ground.
Final Notes
Obviously, we have only scratched the surface of 3-D rendering. We have only rotated our camera around one of three axes (the z axis). We have not considered drawing complex structures with 3-dimensional surfaces--only some of which can be visible to the camera. But I believe that we have hit on many of the areas of interest to high school students developing simple 3-D video games.
SIIIIIIIIIIIIIIIIIIIIIIIIIIIIIIIIIIIIIIIIIIIIIIIIIIIIIIIIIIIIIIIIIIIIIIIIIIIIIIIIIIIIIIIIIIIIIIIIIICK
ReplyDelete