Sunday, July 16, 2023

Dave Computes Fibonacci Bands in Aperiodic Patterns

In this post, I'll show that many aperiodic patterns are based on Fibonacci words. Everyone knows the Fibonacci sequence goes 1, 1, 2, 3, 5, 8, 13, 21, 34, 55, 89, etc. Each value is the sum of the two previous values. We can generate the sequence starting from 0 and 1, as follows.

        0
        1
1 + 0 = 1
1 + 1 = 2
2 + 1 = 3
3 + 2 = 5
5 + 3 = 8

Now, instead of treating the values as numbers to be added, think of them as strings to be concatenated. Thus, 1 + 0 gives 10, and 10 + 1 gives 101, producing Fibonacci words like this.

                   0
                   1
1        + 0     = 10
10       + 1     = 101
101      + 10    = 10110
10110    + 101   = 10110101
10110101 + 10110 = 1011010110110

Notice that the lengths of these Fibonacci words correspond to Fibonacci numbers. And each word starts with the bits of the previous word. We can think of these as converging on an infinite Fibonacci word, which begins

10110101101101011010110110101101101 ...

These sequences appear in any Penrose-based aperiodic tiling, as in this picture I drew.


Because these tiles are small and aligned with a grid, it's easy to see that they form horizontal bands. The bands shown in blue are thinner, and the bands shown in yellow and green are wider. On the left, I've marked each of the thin blue rows with a 0, and the wider rows with a 1. Reading down from the top, we get the sequence 110110101101011011, which appears in the infinite Fibonacci word from earlier.

10110101101101011010110110101101101 ...

Penrose-based tilings like this exhibit fivefold rotational symmetry, so we should be able to find these thinner and wider bands in each of the other four directions, and indeed we can. The following shows the exact same picture, but colored to highlight bands running in a diagonal direction.


Reading the bits down from the top-left, we find this sequence also appears in the infinite Fibonacci word.

10110101101101011010110110101101101 ...

These same Fibonacci bands occur in every Penrose tiling, although they can be harder to see.


When I learned of the so-called "hat" tile, I immediately noticed the same Fibonacci bands in these tilings. I've highlighted bands in yellow on this image from the authors of An Aperiodic Monotile.

With Fibonacci bands appearing in the two most interesting families of aperiodic tilings, I decided to write a program to start with Fibonacci bands and generate aperiodic patterns from them. The images below show horizontal and vertical Fibonacci bands. Black bands represent 0s and white bands represent 1s in a Fibonacci word.


Here's an image with both horizontal and vertical bands. Red is used where two 0s meet, black where a 0 and 1 meet, and white where two 1s meet.


And another with diagonal bands.


Devoting fewer pixels per diagonal band generates some nice patterns, due to round-off effects.


Here's that last aperiodic pattern again, this time using only black and white. There is a lot going on in it.


By changing the relative thickness of the original diagonal Fibonacci bands, other interesting aperiodic patterns emerge. (In both images below, black pixels occur where a 0 and a 1 meet. In the left, bands of 1s are 2 pixels wide. On the right, bands of 0s are 2 pixels wide, and a larger portion of the pattern is shown.)


So far, we've only generated patterns using bands running in 2 directions. Using bands running in 5 directions, we can generate Penrose-like aperiodic patterns with fivefold symmetry. Just as every pixel in the images above is part of two different bands, every pixel in an aperiodic pattern with fivefold symmetry is part of five different bands, as in the following image.

In the image above, 40.1% of the pixels are colored green. These correspond to places where two 0-bands cross three 1-bands. Here's a breakdown of the different colored squares in the image.

0 Bands  1 Bands  Color   Percent
5        0        black    3.1%
4        1        white    6.4%
3        2        red     12.4%
2        3        green   40.1%
1        4        blue    32.7%
0        5        yellow   5.2%

Here's the same image in black-and-white, with black corresponding to three 0-bands and two 1-bands.

And the same image again, this time with black corresponding to zero or one 0-bands and four or five 1-bands.

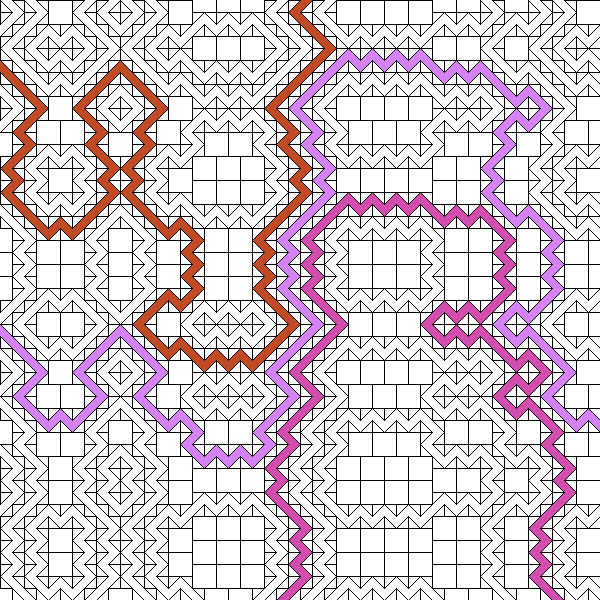
Clearly these are fascinating patterns. Because of how we generated them, we know they're aperiodic and exhibit fivefold symmetry. But are they Penrose patterns? By adjusting the relative widths of 0- and 1-bands, and by moving one set of bands a few pixels this way, another set of bands a few pixels that way, I arrived at the following pattern. The left image uses the earlier coloring rules. In the right image, all the blue and yellow regions have been colored white, and the rest black.

Coloring it as follows, we can see yellow stars, green boats, and blue diamonds in a clear Penrose tiling.


What about threefold symmetry and hat tilings? We'll explore those topics in the next posts.

Friday, June 30, 2023

Dave Computes Advanced Penrose Patterns

In an earlier post, I showed relationships between various Penrose tilings. In this post, I'll show my favorite ways to decorate Penrose tiles, in order to generate interesting patterns. The first is created by adding bold lines to the 5-pointed star, 3-pointed boat, and 2-pointed diamond tiles, as shown below.

Here is a resulting pattern.


My favorite thing about this pattern is that the bold lines form closed regions of ever larger sizes. The smallest regions are the 5-pointed star tiles. The next larger areas are stars formed by 5 diamond tiles. Then come "stars" formed by 5 boats, like the white ones surrounding the gray star tile near the bottom of this image. In fact, we can think of each of these closed regions as being its own tile in an infinite set of aperiodic tiles. Furthermore, we can color those regions, so that regions of one color are always completely surrounded by regions of the opposite color, as shown below. Notice that congruent regions in the same orientation are always assigned the same color.


Here are rules for drawing a similar pattern based on pentagons with 5, 3, or 2 neighbors each.


And here's a resulting pattern.


And colored to show closed regions.


Notice that each closed region consists of pentagons that are all oriented in the same direction, and all pentagons of the same orientation are assigned the same color. Pentagons require a large grid to appreciate the structure, but I love all the gear-like shapes that emerge, like in the following drawing.


I've colored the same pattern, in order to highlight the different sized regions.


Wanting to see more detailed patterns, I set out to make them using smaller tiles, starting with these house-shaped tiles.


And here's a pattern made with these smaller tiles.


Then I explored even smaller "pentagons", in which I collapsed the house pentagon (left image below) until it formed a rectangle (right image below), with one long side of the rectangle consisting of two edges of the "pentagon", and the other long side consisting of a single longer edge.
And here's a pattern that results from using rectangles in this fashion. (I don't find it especially pleasant, and it's really confusing to draw.)


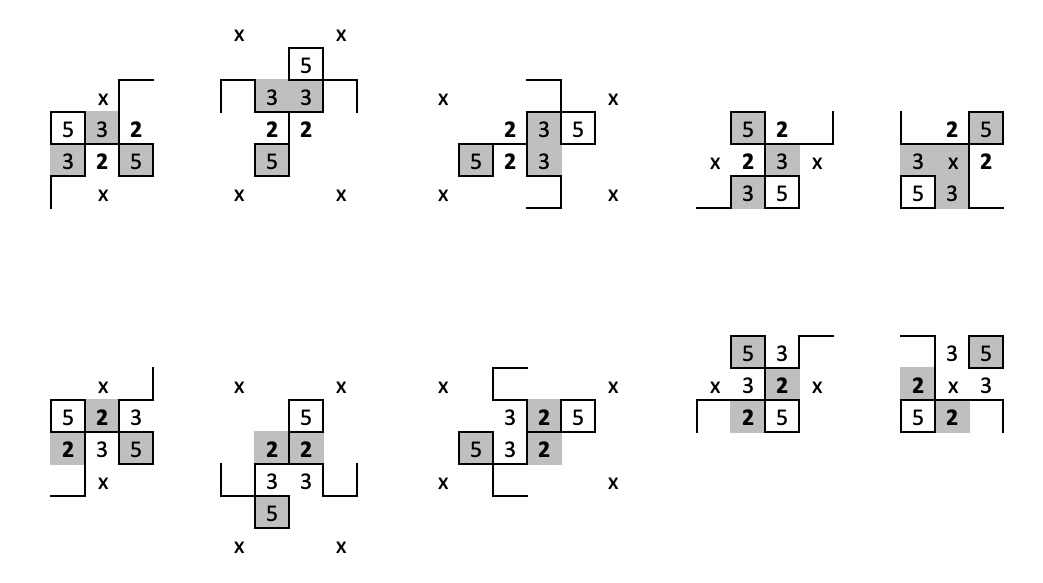
So, naturally, that brings us to my craziest idea of all: using squares to represent pentagons. Specifically, treat one of the corners of each square as if it were an infintesimal fifth side. In the diagram below, consider the picture on the left. The 5 in the gray box represents a pentagon with 5 neighbors. The question marks indicate the locations of those 5 neighbors. The 5 shares an infinitesimal "side" with its upper right neighbor. The empty space above and to the left of the 5, along with the empty space below and to the right of the 5, represent spaces that will be filled with 2s or 3s that are not adjacent to the 5 pentagon. The x represents a space that will never be filled by any pentagon.


As before, there are two kinds of 5s--shaded 5s surrounded by unshaded 2s and 3s, and unshaded 5s surrounded by shaded 2s and 3s. I'm using the convention that all shaded 5s have an x in the lower left, and all unshaded 5s have an x in the upper right.

The following diagrams show all the ways that a 3 may appear adjacent to a 5.
And the following diagrams show all the ways that a pair of 2s may appear adjacent to a 5, forming a "diamond".

Here's a complete drawing using these rules. I love that these rules sometimes terminate in a square shape like this one.


Notice that the x squares (the ones that don't correspond to pentagons) form a grid, with all the x's appearing in the same rows and columns (and that the particular rows and columns correspond to bits in Fibonacci words). With difficulty, I can draw these patterns without writing any numbers (as long as I mark the non-pentagon squares). But I wrote a computer program to generate the larger patterns below.

50 × 50

100 × 100

200 × 200

500 × 500


Tuesday, June 27, 2023

Dave Computes Cohort Groups for Hybrid School during COVID-19

To permit social distancing during the COVID-19 pandemic, the school where I teach decided on a hybrid learning model. Each day, half the students in grades 6 - 12 would come to school in person and the other half would stay home and learn online. The school then changed its plan to split students into 4 groups, with only 1 group attending school at a time. Given the complexities of our schedule, I was skeptical that this could be done without very lopsided class sizes. And I was certain the school had no software or process to create these groups. I therefore wrote a program to put students into groups that would allow for balanced class sizes. I was shocked when it successfully generated fairly balanced classes. Here's the algorithm I used.

1.  I assign each student to a random group.

2.  I determine how balanced each section is. For example, suppose a particular section of some class has 18 students. If we're dividing students into 2 groups, then ideally there'd be 9 students in each group. But we'd be fairly happy to have 10 students in one group and 8 in the other. We'd be much less happy with an 11-7 split, and quite disappointed with a 12-6 split.

I want to pick a numerical score that captures how lopsided the split is. One way is to look at how much each group deviates from the ideal size. A 9-9 split would have a score of 0. A 10-8 split would have a score of 1, since 10 is one more than ideal and 8 is one less than ideal. An 11-7 split would have a score of 2, and 12-6 would have a score of 3. Technically, this number is called the standard deviation.

The problem with this approach is that, while 10-8 is only slightly worse than 9-9, intuitively 12-6 feels MUCH worse than 11-7. I therefore used the square of the deviation as my lopsidedness score. Thus, 11-7 has a score of 2 × 2 = 4, while 12-6 has a score of 3 × 3 = 9, as shown below.

Grp1  Grp2  StDev  Score
 9      9    0     0 × 0 = 0
10      8    1     1 × 1 = 1
11      7    2     2 × 2 = 4
12      6    3     3 × 3 = 9

(Technically, my lopsidedness score is called the variance, and it can be calculated for any number of groups--not just 2. For example, if students are split into 3 groups, then the ideal group size for a section of 18 students is 18 / 3 = 6 (technically called the arithmetic mean). If the students in this section are split 8-7-3, then the variance is [(8 - 6)² + (7 - 6)² + (3 - 6)²] / 3 ≈ 4.67.)

3.  I calculate the lopsidedness score for every section in the schedule. I add up all of those scores. That sum tells me how lopsided the entire schedule is.

4.  I pick a random student and I assign them to a different random group. Then I calculate the lopsidedness score for the entire schedule again. If the new score is higher than the old one, then the schedule is less balanced than before. I would therefore return the student to their original group. If, however, the new score is better (lower) than the old one, then the schedule is more balanced and I keep the student in the new group.

5. I continue assigning random students to random groups that reduce the lopsidedness score. Eventually, I reach a point where any change would make the score worse. I have therefore reached a local minimum, and I save these results.

6. I repeat this entire process again, assigning all students to random groups and then randomly assigning individual students to different groups until I can't improve the score anymore. Sometimes the final lopsidedness score is better and sometimes it's worse. Whenever I arrive at a new record (lower than all previous records), I save the results.

Though not optimal, the results were quite satisfactory. (Note that finding the optimal schedule for n students is an NP-Complete problem, and is therefore intractable for the number of students involved here.)

A couple of additional considerations. I kept all students with the same last name in the same cohort. That way, students in the same household would have school on the same day. I also modified the code to swap random students, in addition to swapping which cohort a single student was assigned to.

Saturday, July 18, 2020

Dave Computes Euchre Strategy

I recently got signed up for a Euchre tournament, having never played before. I searched the web in vain for a really simple strategy I could follow. Instead, I found a lot of complicated anecdotal advice. After losing the tournament, I wrote a machine learning program that simulated 2 billion games of Euchre to identify a simple evidence-based strategy. I'll get to that, but first ...


The Rules

1.  The game uses 24 cards:  9, 10, J, Q, K, A of each suit.

2.  There are 4 players, which I'll call player 1, 2, 3, and the dealer.

3.  Five cards are dealt to each player.

4.  Player 1 leads by playing any card from their hand. Then each of the other players take turns playing one card from their hand. If possible, they must play a card of the same suit as the one that was led. Otherwise, they can play any card. When four cards have been played, the player with the highest card takes the trick and then leads by playing any card from their hand, and so on.

5.  The cards of one suit, designated as trump, always beat cards in any other suit (even the suit led).

6.  The jack of trump is the highest card. The other jack of the same color is also considered to be trump, and so there are 7 trump cards. That jack is the second highest card, followed by A K Q 10 9 of trump, and then by A K Q J 10 9 of the suit led.

7.  At the start of each round, one of the 4 cards not dealt is turned up. Player 1 can name that suit as trump. If they pass, then player 2 can name that same suit as trump, then player 3, and then the dealer. No matter who names trump, the turned up card is given to the dealer, who must then discard a card before player 1 can lead. If the dealer passes, then the turned up card is removed from the game. Player 1 can name any suit but the original one as trump. If they pass, then player 2 can name any suit but the original one as trump, then player 3, and then the dealer. In the variation I play, the dealer is not allowed to pass at this time and must name trump.

8.  Players 1 and 3 are partners, as are players 2 and the dealer.

9.  If the partners that named trump take 3 or 4 tricks (combined), they earn 1 point. If they take all 5 tricks, they earn 2 points. If they fail to take at least 3 tricks, then the other team earns 2 points.

10.  The first team to earn 10 points wins.

11.  When a player names trump, they may announce that they are going alone. In that case, their partner does not play this round. If the player that named trump takes all 5 tricks, then their team earns 4 points (instead of 2). Otherwise, the scoring is the same.


Naming Trump:  Simple Way

Choosing whether to name trump or to pass is the most important decision in the game. My software identified very simple guidelines that even a beginner can follow.

1.  In general, name trump whenever you hold at least 3 trump cards.

2.  Count the jack of trump as 2 trump cards. (The jack in the same color only counts as 1.)

3.  If naming trump will send the turned up trump card into your opponent's hand, you must hold at least 4 trump cards.

4.  If you are the dealer, and naming trump will send the turned up card into your own hand, count that card as if it's already in your hand. (This does not apply to the dealer's partner, who must hold 3 trumps to name trump.)

These rules are summarized in the following table.  J indicates the jack of trump and T indicates any other trump card.

Player  J=2 T=1  Minimum Hands
1       4        JTT or TTTT
2       3        JT  or TTT
3       4        JTT or TTTT
Dealer  3        JT  or TTT (including turned up card)
1       3        JT  or TTT
2       3        JT  or TTT
3       3        JT  or TTT

Naming Trump:  Better Way

Here's the more detailed guide my program arrived at for choosing trump.

Player  Turned Up  J=7 T=4 A=1  Minimum Hands
1       J         20           TTTTT
1       T         15           JTT, TTTT
2       J          9           TTA
2       T         11           JT, TTT, TTAAA
3       J         15           TTTT
3       T         15           JTT, TTTT
Dealer           11           JT, TTT, TTAAA (including turned up card)
1       Same       8           TT, JA
1       Opposite   12           TTT, JTA
2       Same       11           JT, TTT, JAA, TTAAA
2       Opposite   9           JT, TTA, JAA, TAAA
3       Same       9           JT, TTA, JAA
3       Opposite   10           JT, TTT, TTAA

The Minimum Hands column shows the minimum hands the program identified as being playable in each situation. I wrote another program to identify numeric values for J, T, and A. The values J=7, T=4, and A=1 were the smallest values that reproduced the ordering of the vast majority of the identified hands. As before, J represents only the jack of trump, T is any other trump (including the other jack of the same color), and A is any non-trump ace. For example, JT is worth 7 + 4 = 11, TTT is worth 4 + 4 + 4 = 12, and TTAAA is worth 4 + 4 + 1 + 1 + 1 = 11, and so any of these hands can name trump in a situation that requires a minimum score of 11. (My software found it was not worth identifying more specific values for other cards. A non-trump king proved to be worth only slightly more than a non-trump 9, and a great deal less than a non-trump ace. Likewise, the value of the other jack of the same color proved to be closer to the value of any other trump than to the value of the jack of trumps. My software also originally kept track of the number of suits in the hand, but ultimately this information proved less valuable than the features identified in the table above.)

Let's walk through the findings in the table. For the most part, seats 1 and 3 require 15 points to play (e.g. JTT), while seats 2 and the dealer require only 11 points (e.g. JT). That's in line with the simpler table shown earlier. This new point system identifies that seat 2 and the dealer can now also play TTAAA for 11 points, but that's a very rare hand. When the turned up card is a jack, the table shows that player 1 must hold only trump in order to name trump. (I suspect that holding 4 trumps in that situation may be good enough to win, but can earn more by letting an opponent name trump.) The most common situation where the detailed table differs from the simpler one is that player 2 can now name trump with only TTA if the turned up card is a jack.

After the dealer has passed, the table identifies playable hands by whether the trump suit is the same color as the original turned up card or the opposite color. For example, if everyone passes on  then player 1 only needs 8 points to name , but 12 points to name  or . But by the time that player 3 plays, color doesn't matter nearly as much.


Discarding Cards as Dealer

When the turned up card's suit is named as trump, the dealer picks up that card and discards any card from their hand. There is broad agreement that you should hold onto any trump or ace, and discard the lowest card in your shortest suit--the suit you have the fewest of. In the case of a tie, prefer to discard the opposite color as trump.

In all examples, we'll assume that trump is .

Example #1
You hold J♣ 9♣ K♦ J♥ 9♥ 9♠. You should discard K♦. You're hoping now that diamonds are led so that you can take the trick with 9♣.

Example #2
You hold J♣ 9♣ A 9 K Q. You should discard either . You're hoping now that  is led so that you can take the trick with 9♣. However, if an opponent leads  and your partner plays A♠ or a low trump, then you can discard your other heart and let your partner take the trick. If your partner is paying attention and holds the right cards, they'll lead hearts now and you can take the trick with 9♣.


Playing Trash When Another Player Leads

Often, you'll have no choice of what to play, because you hold only one card in the suit led. Sometimes your choices are irrelevant, like when you can only play K or Q of the same suit. When you do have a meaningful choice, it will usually come down to which trash to play.

Example #1
Others played:  A 10 Q
You can play:  K 9
Because you can't win this trick, you should play your lowest card:  9♦

Example #2
Others played:  A 10 Q
You can play:  10 Q 10♥ K
Because you can't win this trick, and you hold trump, you should probably play your shortest suit:  K

Example #3
Others played:  A 10 Q
You can play:  Q 10♥ K
Because you can't win this trick, and you don't hold trump, you should play the card that is least likely to win a future trick:  10


Playing Last

The strategy is straightforward when you're the last person to play on a trick. Simply play the lowest card you can so that your team wins the trick. If you can't win, play trash, as described in the previous section.

Example #1
Others played:  10 9 Q
You can play:  A Q
You should play the lowest card that wins the trick:  Q♦

Example #2
Others played:  A 10 10
You can play:  J Q Q 10♥ K
You should play the lowest card that wins the trick:  Q (trump)

Example #3
Others played:  A 10♣ 10
You can play:  J Q Q 10♥ K
Because your partner is already winning this trick (with trump), you should play trash:  K


Playing Second or Third

The situation is more complicated when you're the second or third person to play on a trick. That's because you need to decide how strong your play needs to be to win the trick, given that you don't know what card your opponent will play. If trump is led, you should usually assume the trick will be won by the highest trump card still in play. Otherwise, you should usually assume an ace or low trump will win.

Example #1
Others played:  10 9
You can play:  A Q
Your Q is probably too weak to win the trick. Play A.

Example #2
Others played:  10 Q
You can play:  J 9 Q 10♥ K
Your partner's Q is probably too weak to win the trick. Play your lowest trump:  9

Example #3
Others played:  10 A
You can play:  J 9 Q 10♥ K
Your partner's A is probably strong enough to win the trick. Play trash:  K

Example #4
Others played:  Q♣
You can play:  J K
Your K is probably too weak to win the trick. Play your highest trump:  J


Leading:  Simple Way

Here are very simple rules for a beginner deciding which card to lead:

1.  J
2.  A
3.  x (trash)

In other words, lead with the cards that are most likely to take tricks. Always lead the jack of trump. Otherwise, lead an ace. Otherwise, lead with trash. Hold onto other trump cards as long as you can.


Leading:  Better Way

Here's the slightly more complex leading strategy that my machine learning software arrived at. I've found it to be quite effective in practice.

1.  JA / JTT
Lead the jack of trump to help remove your opponent's trump cards from play before you lead an ace or when you hold at least 2 other trumps.

2.  xJx
Otherwise, lead with trash if you have the jack of trump and at least one other trash card. Why not play the jack? You want to avoid taking a high trump from your partner or weak trump cards from your opponents. The second trash card means you won't be forced to play your jack before you find a better moment to pounce with it. To help force your opponents to play trump, prefer leading with trash in your longest suit or (in the case of a tie) in the same color as trump.

3.  J
Otherwise, you should lead the jack of trump as soon as you can.

4.  TAT / TTT / TAAA
Unless you have the jack of trump, you should avoid leading trump. However, there are occasions when your hand is strong enough that it's worth sacrificing a low trump card in order to take your opponents' trumps out of play. This occurs when you'll be left with an ace and a trump, 2 trumps, or (on very rare occasions) all 3 aces.

5.  A
Unless you've got the jack of trump or find yourself with TAT / TAAA, you should lead an ace as soon as you can. If you've got more than one, prefer to lead the ace in the shorter suit (to have the best chance of winning) or (in the case of a tie) in the same color as trump.

6.  x
Lead with trash whenever you don't have the jack of trump, an ace, or at least 3 trump cards. All things being equal, prefer to lead trash in your longest suit or (in the case of a tie) in the same color as trump. That will improve your chances of flushing out trump.

You should think of J here as the highest trump card in play. If the jack of trump has already been played (or wasn't picked up when naming trump), treat the other jack in the same color as if it were the jack of trump. If you know both jacks are out of play, then treat the ace of trump as if it were the jack, and so on. Likewise, if no one chose to pick up an ace when naming trump, you should play your king in that suit as if it were the A.

There are some possible exceptions that my summary above ignores. When your partner names trump, it may be best to lead trump even when you don't have TAT / TTT / TAAA. Also, because your partner will often discard trash in their shortest suit, you might consider leading in the suit your partner just discarded, to let them win a trick with trump.


Playing Equivalent Cards

If you hold both K and Q of some suit, then it doesn't matters which you play. The only reason K is usually stronger is that it beats Q, which you already know that none of your opponents hold. The same is true if you hold, for example, Q, 10, and 9 of trump.

If, like me, you have a terrible memory, you can use your choices in these situations to help you remember the strength of your remaining cards. For example, when deciding between playing 10 or 9 of some suit, consider playing 10. (If you play 9 first, you might forget that 10 can't possibly win a trick.) Likewise, if you hold both jacks of trump, consider playing the lower one first. Or, if you hold both A and K of some suit, you might consider playing A first to stop you from leading K later.


Going Alone

My machine learning did not consider going alone, but you should. Any time you're certain you can take at least 3 tricks by naming trump, you should go alone for the possibility of earning 4 points. Below are all the ways to guarantee 3 tricks. Again, we'll assume  is trump. Each highlighted region earns one of your 3 tricks. The grayed out cards are ones you don't hold.

1.  J J A
Go alone whenever you hold the highest 3 trump cards, since they're certain to take 3 tricks. If you don't hold all 3 of these, then you'll need at least 4 trumps to go alone.

2.  J J  
Whenever you hold 4 trump cards, you're certain to win at least one trick (because your opponent can't hold more than 3 trumps). So, if you hold the highest 2 trumps and you have a total of 4 trumps, you'll win at least 3 tricks.

3.  J J A K 
If you don't hold J♠, you'll need both A♣ and K♣ to make up for it (since one of them may be lost to J♠). As before, your 4th trump guarantees you'll win a trick.

4.  J    A
If you hold 4 trumps, you can usually count on winning another trick with a non-trump ace. (The problem here is if your opponent leads that suit and your other opponent trumps it.)

5.  J J A K 
If you don't hold J, you'll need both J♠ and A♣ to make up for it (since one of them may be lost to J). But then you can count on K♣ to earn a 2nd trick and a 4th trump to earn a 3rd trick.

6.  J J A   A
Again, J♠ and A♣ take one trick. The 4th trump takes another, as does the non-trump ace.

7.  J J A K Q  A
If you don't hold J or J♠, you'll need A♣ K♣ Q♣ to make up for it (since 2 of them may be lost to jacks). The 4th trump takes another trick, as does the non-trump ace.

8.      
When you hold any 5 trumps, your opponent can't hold more than 2. Even if both beat you, you'll still take 3 tricks with your remaining trumps. Therefore, you should always go alone with 5 trumps.

Sunday, September 1, 2019

Dave Computes Chair Fractals

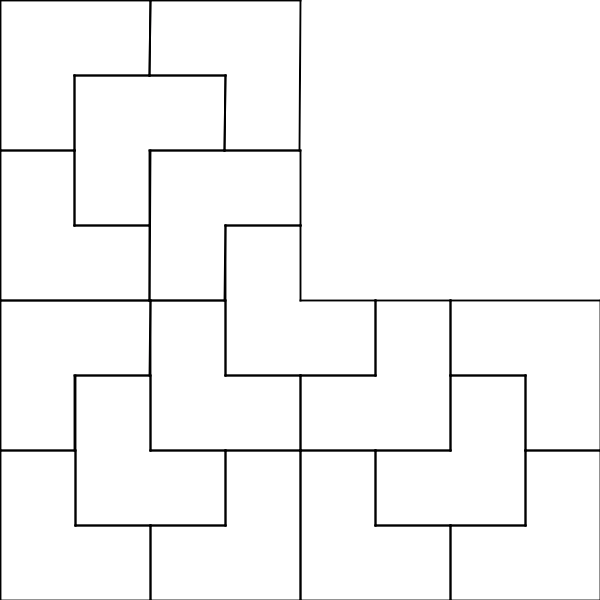
The Chair Fractal leads to some surprisingly interesting doodles. The rule for this fractal is simple. Start with an L and subdivide it into 4 smaller L shapes as follows.


Subdivide each L again.


After a while, you'll see something like this.


The result is a simple aperiodic tiling. Before we make it more interesting, it's helpful to learn to draw the fractal without subdividing. Start by drawing several nested L shapes. The number of shapes should be one less than a power of 2 (e.g. 1, 3, 7, 15, 31, 63).


Draw nested L's from each corner to the center.


Continue as follows.


Eventually, a square region is filled in, with only the corner missing.


Things get more interesting when we replace each L shape by the figures shown in the top right of each image below. I have also filled in the shapes in some of these patterns.


Wednesday, July 24, 2019

Dave Computes Ladder Doodles

Here's a kind of doodle I've been drawing for a while now. It started from the idea of tiling a grid with a single square tile.


Here's a small tiling. The tile can be rotated, and adjacent edges must be the same color.


After a while, I stopped thinking of it as a tiling. For lack of a better name, I'll call these ladder doodles. I begin with horizontal line segments across the top of a page of gridded paper. Some lines are drawn on the top row and some on the second row, chosen at random. Then I copy those lines down the page, on every other row.


Then I repeat with random vertical line segments copied across the page.


The entire drawing is uniquely determined by the choices on the top row and left column. Thus, a drawing on an n × n grid contains exactly 2n bits of information. I like drawing diagonal lines to show the paths more clearly.


The paths can get quite intricate in larger drawings.


Here I've filled in the drawing with random colors.


And here are a couple more.


Thursday, June 27, 2019

Dave Computes Too Much: Managing Repetitive Strain Injuries

I've endured years of wrist pain from working at my computer. Switching hands just made the other wrist hurt. I bought ergonomic mice and keyboards, but nothing seemed to stop the dull ache in my wrists. I got a lot of bad advice from doctors and physical therapists before I found routines that worked for me. Here's what I learned.


What Doesn't Work

Painkillers - Don't take painkillers just to continue working. The pain is telling you to change the way you use your body. Drowning out that signal with painkillers might help for a few hours, but it can't be a permanent solution. Painkillers might be helpful if pain is keeping you from sleeping, but even then, consider using a cream like Icy Hot or Bengay.

Splints - Don't use splints just to continue working. Putting my wrists in splints felt better at first. I didn't notice the pain as often when my wrists were immobilized. But it came back if I tried to work with splints on.

Steroid Injections or Surgery - Your doctor may recommend steroid injections or carpal tunnel surgery. That may be good advice for you, but do some research before taking this drastic step. There are lots of people who had steroid injections or surgery, only to have the same pain return a few years or months later.

In short, if you're still using your body in the same way, none of these "treatments" will eliminate your pain.


What's Causing the Pain

There is a bundle of blood vessels and nerves that connects the spinal column to each of your hands. The bundle emerges from the lower neck and passes under the collarbone to the armpit. (To learn more, search brachial plexus and thoracic outlet syndrome.) If, like me, you compute with your body hunched forward to reach the keyboard or to see the screen better, then those nerves and blood vessels will be compressed while you work. Depending on your posture, you may experience numbness in your hand due to a compressed nerve. Or compressed blood vessels may prevent your arm muscles from working properly. Tightened muscle fibers in your arms can exert a constant pull on your wrist, causing a dull pain.

In short, what you feel in your wrists is caused by how you're positioning your neck and shoulders when you work.

It's not easy to change the way you use your body. Years of hunching forward tightens the muscles and fascia in the front of your neck and chest, and it stretches and weakens the muscles in your upper back. To get better, you're going to need to work on all these areas. Harder still, you must become aware of how you're positioning and using your body. You'll need to recognize which muscles you're using, so that you can take breaks as soon as you notice yourself falling back into old habits.


What Works For Me

Massage - This is not the relaxing kind of massage. Instead, I'm talking about targeting specific muscles. There are no muscles in your wrists, so massaging your wrists won't help. Your fingers are pulled on by long tendons that pass through your wrist and connect to the muscles in your forearm that control them. To loosen these muscles, massage your forearm just below your elbow. Use slow movements with strong pressure. This is easiest to do by pressing and sliding your arm firmly and slowly over a ball, letting the ball roll along a wall or tabletop. Lacrosse balls work best, but tennis balls are fine, too. Massaging your forearm often brings relief, but only temporarily. That's because other tight muscles higher up are pulling on the muscles in your forearm. For sustained relief, you'll need to work on muscles in your neck, chest, and upper back. I've spent a lot of time working on my scalene muscles. There are three of these on each side of the neck. They can be massaged by holding one hand pressed into the side of the neck and moving it slowly with appropriate pressure from the other hand. I've also found it helps to work on the muscles under my shoulder blades, by bringing my arm across my chest and pressing my back into a ball on a wall. I even think it's been helpful to work on muscles in my lower back (with ball against the wall), as these seem to help improve my posture and prevent me from leaning forward at the shoulder and neck. I have a theory that massage can help your body find the places that need repair, but you need to get enough restorative sleep for it to heal. I've found massage most helpful for relieving pain in the short term, but other measures are required to prevent it from coming back.

Traction - It's not just muscles that can become too tight. It's also fascia--the stuff that covers your muscles like plastic wrap. To work on tightened muscles and fascia, I tried many stretches without success before discovering traction. With traction, you let friction pull just slightly on some part of your body over several minutes. I lie down with a foam roller under the length of my spine. I place my head so that my neck is stretched just a little taller than usual, and I spread my arms out wider than usual with my hands resting on the floor. After 10 minutes, I get up and feel much better. It works even better when combined with meditation, which I'll get to shortly.

Strengthening - You've probably relied too much on some muscles and ignored others. You'll need to strengthen the right muscles in order to put them to work again. If you've been working in a compressed position, you've probably stretched and ignored your upper back muscles. Regular exercise of this area can go a long way. I've found that I benefit from exercises that squeeze my shoulder blades together. I've also recently discovered that strengthening my core by doing lower back exercises seems to improve my posture (and body awareness) in a way that's perhaps been the most effective way to prevent the pain from returning.

Meditation - This has been the most important piece for me, with pain reduction being just one of many benefits. I practice mindfulness meditation, where you bring your attention to your breath, returning to it whenever you notice your mind wandering. It's best to set aside at least 10 minutes a day for this. Stress can drive you to work in awkward positions without breaks, and meditation can reduce that stress. My favorite kind of meditation is called a body scan, in which you bring your attention to one body part at a time, focusing especially on those areas where you experience tightness or pain. Observe these sensations with curiosity, accepting them without judgment. Sometimes, just by bringing your attention to a part of your body, you'll sense the muscles there relaxing, but you shouldn't strive to make this happen. To start, you might try listening to body scan recordings on YouTube. Over time, you'll become more aware of how you're using your body when you're at your computer. You'll discover which positions cause unnecessary strain. You'll learn to sit or stand with better posture in ways that don't strain those tight muscles. Personally, I've noticed through meditation that I tend to breathe too much from my abdomen. I find a lot of relief if I imagine the air in my chest sliding upward and into my shoulders (which seems to encourage my scalene muscles to lift my collarbone). I have also discovered that the seat of my consciousness seems to live in my jaw or neck region. If I pay more attention to sensations around my eyes, sometimes my neck loosens up and I breathe easier.

Best of luck!